Easy Origami Pig DIY: Beat The Boar-dom With This Cute Craft!


Gallery
Origami is an amazing ancient craft that is most often connected with Japan (though it also has roots in China and Europe), which is based on folding paper into elaborate 3D shapes and structures.
Translating from Japanese as 'folding paper', origami is the art of folding a single sheet of square paper, which is coloured on one side and plain on the reverse.
Traditional origami doesn't include cutting, glueing or taping - focusing instead on making neat, precise folds - and so it is great for kids who enjoy a challenge, or who want to learn a new craft and skill.
How To: Origami Pig Instructions
The first step is to place your square of paper on a clean surface, turning the square by 45-degrees so that you are working with a diamond shape (with the corners at the top, bottom, left and right).
Fold in half to make a crease from top to bottom, then unfold, and fold in the other direction, to make a crease that runs from left to right. Next, take the left corner, and fold it inwards toward the centre line - then repeat on the right.
Then fold the entire shape in half, bringing the top corner down to meet the bottom corner.
You should now have a shape that is a rectangle at the top, with a triangle at the bottom.
In order to make the pig snout, fold the two pointed corners - which are at the bottom of the triangular shape - upwards.
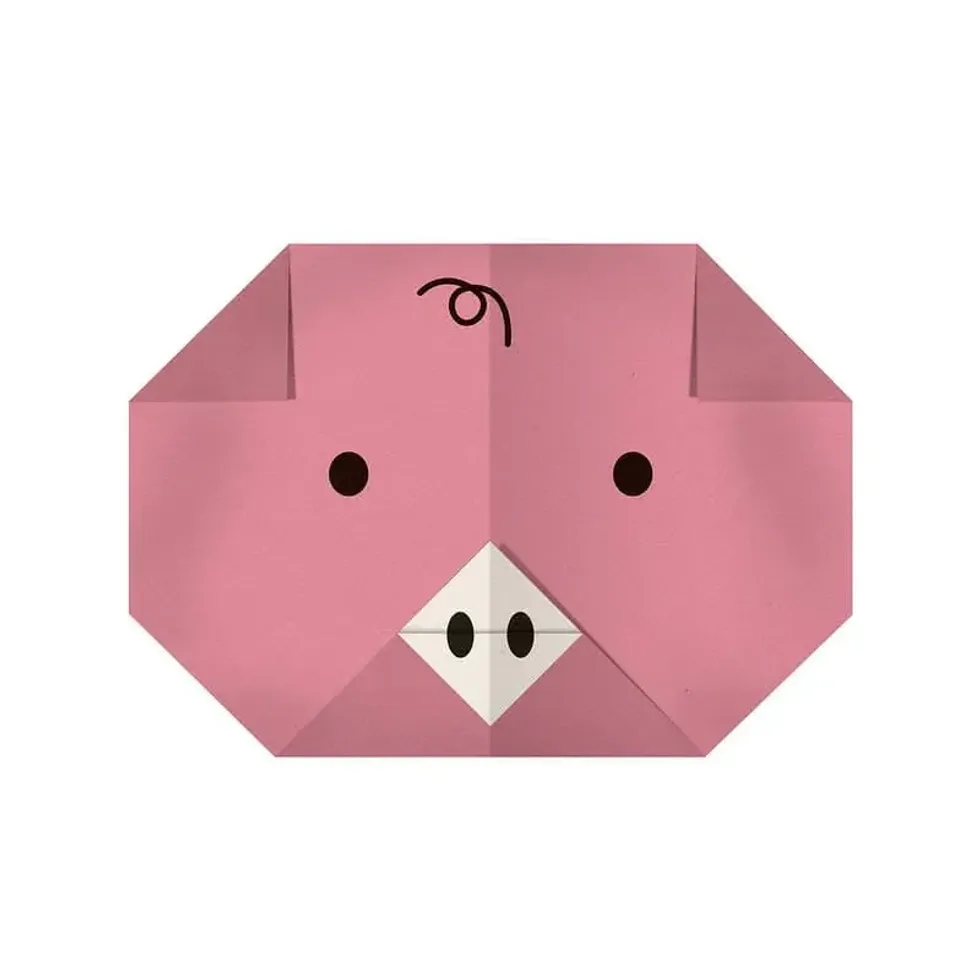
Fold it until the triangular point comes above the line of the rectangle, and then fold only the top sheet of paper down, bringing the tip of the triangle down in line with the bottom of the shape - this will create a white square/diamond shape, which will become the pig snout.
To make the pig ears, simply fold down the top corners, creating small triangular shapes at the top right and left of the paper shape.
Now the basic pig shape has been completed, the last step is to take a black marker pen, adding two small dots for the pig's eyes, as well as adding another two dots in the nose in order to complete the pig origami.
If You Don't Have Origami Paper
If you don't have pink origami paper, you could always use normal paper - or alternatively, you could neatly glue two sheets of paper together - one pink and one white - with a thin layer of glue stick or PVA.
If you are organised, you could always have the kids paint a thin layer of acrylic paint onto a white sheet of paper, letting it dry before using - or have the kids colour one side of a sheet of paper with pens or coloured pencils before starting this easy origami task.
Tips And Tricks
Although making this origami pig is easy once you know how, it can be a good idea to use a piece of scrap paper - something from the recycling, or even an old sheet of newspaper - to practice with. Once you have done a practice run, you will feel more confident about making a brilliant origami pig.


We Want Your Photos!
More for You


See All
Bachelor of Arts specializing in Fine Art
Rosanna RobertsonBachelor of Arts specializing in Fine Art
Rosanna is a creative and enthusiastic individual who enjoys finding ways to entertain kids through art and crafts, games, and cooking. With a Bachelor's degree in Fine Art from the Central Saint Martins College of Art & Design, she brings a unique perspective to her projects, making them both colorful and educational. She is always full of ideas for homemade cards, handcrafted gifts, toys, and decorations that are perfect for children of all ages.
Disclaimer
1) Kidadl is independent and to make our service free to you the reader we are supported by advertising. We hope you love our recommendations for products and services! What we suggest is selected independently by the Kidadl team. If you purchase using the Buy Now button we may earn a small commission. This does not influence our choices. Prices are correct and items are available at the time the article was published but we cannot guarantee that on the time of reading. Please note that Kidadl is a participant in the Amazon Services LLC Associates Program, an affiliate advertising program designed to provide a means for sites to earn advertising fees by advertising and linking to Amazon. We also link to other websites, but are not responsible for their content.
2) At Kidadl, we strive to recommend the very best activities and events. We will always aim to give you accurate information at the date of publication - however, information does change, so it’s important you do your own research, double-check and make the decision that is right for your family. We recognise that not all activities and ideas are appropriate for all children and families or in all circumstances. Our recommended activities are based on age but these are a guide. We recommend that these ideas are used as inspiration, that ideas are undertaken with appropriate adult supervision, and that each adult uses their own discretion and knowledge of their children to consider the safety and suitability. Kidadl cannot accept liability for the execution of these ideas, and parental supervision is advised at all times, as safety is paramount. Anyone using the information provided by Kidadl does so at their own risk and we can not accept liability if things go wrong.
3) Because we are an educational resource, we have quotes and facts about a range of historical and modern figures. We do not endorse the actions of or rhetoric of all the people included in these collections, but we think they are important for growing minds to learn about under the guidance of parents or guardians.