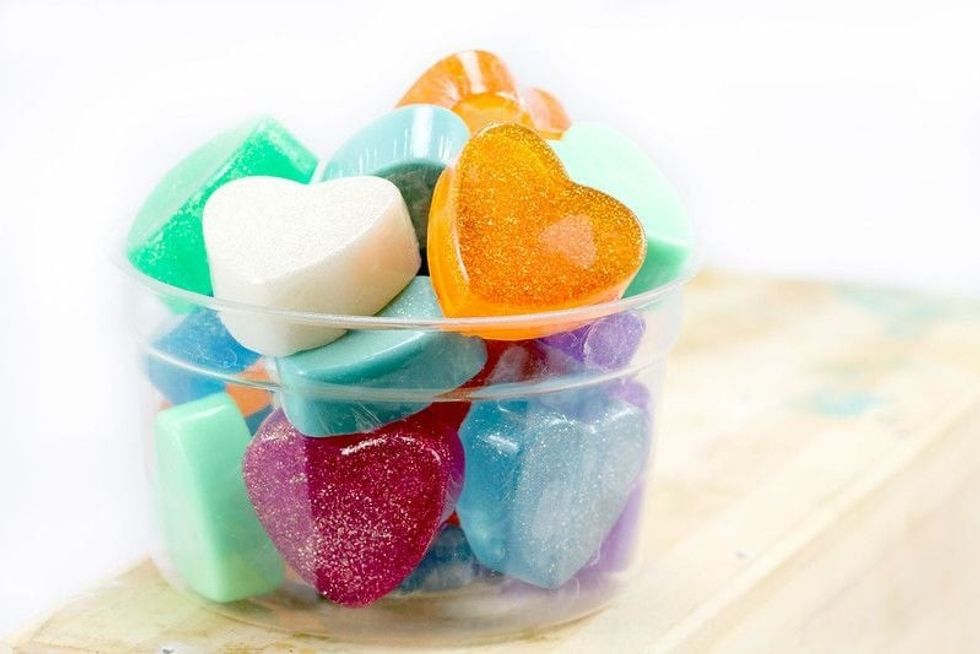
How To Make Soap For Kids

Gallery

Are you looking for a new craft for your and children to enjoy together?
You should give soap making a try, not only is it a fun activity but it is also really useful and it can encourage children to take pride in hand washing. Not only this, but it provides great fun for bath times, alongside a homemade bath bomb, of course.
Making soap may seem like a complicated task but it can actually be done with ease and is a delightful craft. Whether you're looking to make the soap from scratch or work with a pre-made soap base, we can't wait to help you on your soap-making journey.
If homemade soap isn't for you, why not give these recycled craft ideas a go?
Age Range: This craft is suitable for kids aged six to ten, under adult supervision.
Benefits Of Making Soap At Home
Homemade soap hosts a range of benefits; not only is it fun, but it also encourages your kids to wash their hands regularly and gives them plenty of bath time fun. Here are some of the reasons why making soap with kids a great idea.
You Know What The Soap Contains: When buying shop-bought soap, it can be a task trying to work out what it actually contains. Whereas, if you make homemade soap, it allows you to remove any of the nasties and create a natural product.
You Can Cater To Any Allergies: If your child is allergic to certain fragrances or suffers from sensitive skin, you can avoid these in your homemade soap. This will create the perfect soap for your child's needs whilst having lots of fun.
Making Your Own Soap Can Be Cost Effective: When making soap, you can choose to make it in large batches, allowing the soap to be wrapped up and kept for a later date. This is a great money-saving tip!
It Provides Plenty Of Fun: Allowing your children to be involved in the process of making the soap will provide them with plenty of fun, from adding the colours as well as other exciting decorative elements.

Ingredients And Equipment
If you're looking to make soap with kids using a pre-made soap base, begin your journey here.
You Will Need:
Essential oils (which one you go for will be based on your personal preferences, but here are a number of scents for unique and traditional soap smells).
Clear soap base (glycerine).
A microwavable dish.
Moulds or a loaf tin.
A toothpick or small spoons.
How To Make Soap With Kids
1) Start by cutting the soap base into little cubes then put these cut up pieces of glycerine into a microwavable bowl. Melt this for around 90 seconds, dependent on the amount of soap and the heat of your microwave.
2) Once you've taken this out of the microwave the fun begins, pour into the moulds of your choice, these can be any moulds which your kids love. Picking a fun shape will make the process even more exciting!
Whether you're looking to go down the route of a traditional bar or a unique choice, the choice is yours. Once you've poured the soap into the moulds, it's time for the kids to take over.
3) Lay out a bunch of soap dyes and essential oils for your kids to pick from. Once they have chosen one, they can carefully pour them into the mould and stir. A toothpick or a small spoon is an excellent tool for this.
4) Set your soap aside to harden then pop it out of the moulds ready to use. The setting process usually works best overnight, with the soap ready to be used the next morning.
Tips, Tricks And Ideas
If you're making soap with kids who are over the age of eight, allow them to use a blunt knife to cut the glycerine into cubes themselves, this adds an extra element of fun for them.
There are so many different patterns that you can include in your soap, whether you're looking to use two colours or more, adding them in and creating other effects with your toothpick is super cool.
Be sure not to put any bowls or cutlery that you've used into the dishwasher, if you have one, without rinsing them first or you may end up with a very soapy kitchen!
Soap making for kids is a quick process as the mixture quickly begins to set. This means that it may take a few attempts to perfect it. However, it's fun every time!
One of the great things about learning how to make soap at home is that you can create soap which only includes natural ingredients and pick and choose scents that your children like, creating the ultimate natural soap bar.
Bonus: Making Your Own Soap Base
If you're looking to make your soap base at home (rather than using the shop-bought option), this will need to be done by adults only as it includes a chemical called lye.
It is also worth bearing in mind that your soap base will take 30 days to cure before you can use it to create soap.
This is by no means an essential part of the soap making process, if you're looking to make soap with a shop-bought soap base (which is ideal for beginners and kids), you can focus on the instructions above.
To Make A Soap Base, You Will Need:
62ml of Sodium Hydroxide.
124 ml Distilled water.
150ml Coconut oil.
25g Shea Butter.
225ml Olive Oil.
100ml Sunflower Oil.
Method (For Adults Only):
1) Weigh out all of the ingredients. This needs to be precise as soap making is time-critical and there isn't time stop and weigh during the process.
2) Combine your olive and sunflower oil into a bowl and put aside. Then take to melting your coconut oil and shea butter in a pan. Once melted, also set aside.
Important: The next step involves using lye. This requires wearing goggles and gloves. Make sure that kids and pets are out of the room whilst you are completing this step as it can be dangerous.
3) Add lye into room temperature water in a glass container (it must be glass). When you've added the lye, you can expect your mixture to get hot and will release steam. Once this has happened, stir with a stainless steel spoon until the lye has disappeared.
4) Grab your digital thermometer and check both the oils and the lye are at 40° before mixing them. Once they're at the same temperature, gently pour the lye mixture into the oils and blend using a blender if possible.
Blend until it is thick and creamy and then quickly pour it in bar moulds. Tap these a few times to remove any air bubbles. The moulds can be any shape of your choice.
5) Leave your soap in their moulds for the next 48 hours. Then once you've removed them from the moulds, place them in a flat well-ventilated area for 30 days. Make sure to turn them over every week or so.


We Want Your Photos!
More for You
See All
Bachelor of Science specializing in Cinematography and Film/Video Production
Olivia ThristanBachelor of Science specializing in Cinematography and Film/Video Production
With a degree in Film and Television Production from Staffordshire University, Olivia is a writer who is passionate about photography and loves to watch documentaries. When she's not working on her writing, Olivia can usually be found experimenting with baking, collecting Lego figures, getting creative with polymer clay, and searching for the best pizza joints in the West Midlands and beyond.
Disclaimer
1) Kidadl is independent and to make our service free to you the reader we are supported by advertising. We hope you love our recommendations for products and services! What we suggest is selected independently by the Kidadl team. If you purchase using the Buy Now button we may earn a small commission. This does not influence our choices. Prices are correct and items are available at the time the article was published but we cannot guarantee that on the time of reading. Please note that Kidadl is a participant in the Amazon Services LLC Associates Program, an affiliate advertising program designed to provide a means for sites to earn advertising fees by advertising and linking to Amazon. We also link to other websites, but are not responsible for their content.
2) At Kidadl, we strive to recommend the very best activities and events. We will always aim to give you accurate information at the date of publication - however, information does change, so it’s important you do your own research, double-check and make the decision that is right for your family. We recognise that not all activities and ideas are appropriate for all children and families or in all circumstances. Our recommended activities are based on age but these are a guide. We recommend that these ideas are used as inspiration, that ideas are undertaken with appropriate adult supervision, and that each adult uses their own discretion and knowledge of their children to consider the safety and suitability. Kidadl cannot accept liability for the execution of these ideas, and parental supervision is advised at all times, as safety is paramount. Anyone using the information provided by Kidadl does so at their own risk and we can not accept liability if things go wrong.
3) Because we are an educational resource, we have quotes and facts about a range of historical and modern figures. We do not endorse the actions of or rhetoric of all the people included in these collections, but we think they are important for growing minds to learn about under the guidance of parents or guardians.