How To Make 3D Paper Flowers


Gallery
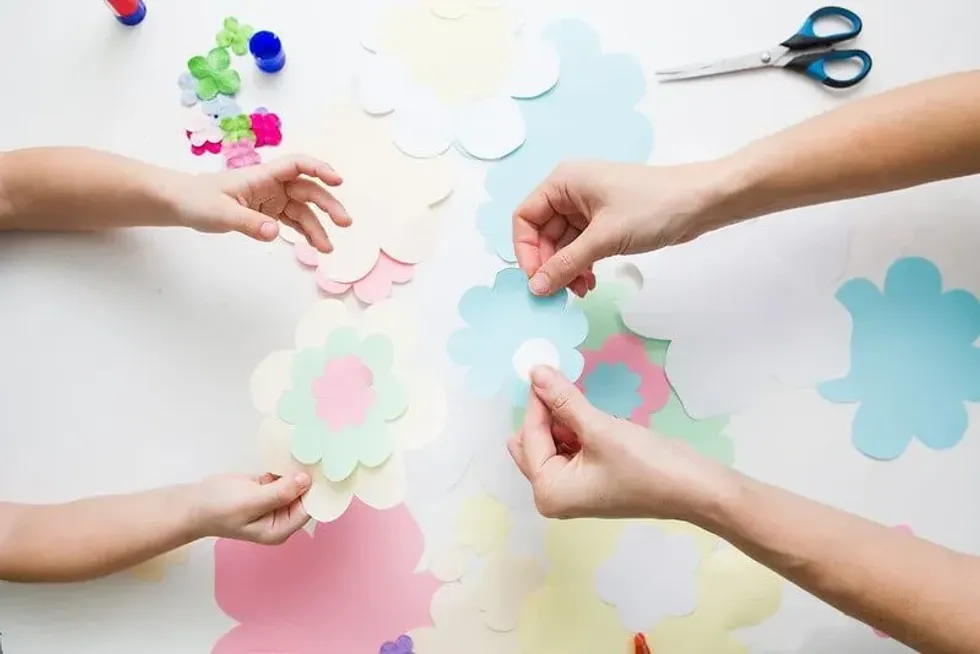
3D paper flowers are a lot of fun to make - and what better time to get started than after the amazing Spring we've had?
This list of ways on how to make 3D flowers will require just some paper and your imagination. And what's more - all of our ideas are almost mess-free, so you shouldn't have to worry too much about the cleanup and can just enjoy your beautiful creations
Many of us wear paper poppies every year, but what else could your paper flower crafts be used for? We will also be showing you how to display your works of art or what to use them for - from wall decorations to personalised cards - using your beautiful homemade creations.
If you want even more great ideas to making flower art, check out our blog post here.

Easy and simple flowers
If you're looking to make a flower wall or something similar, where you need to make lots - try these simple flowers, as they're quick and easy to make.
Start by cutting out five circles of coloured card (these can be as big or small as you like), and folding each circle in half. After this, stick the folded circles together using double-sided tape or glue, so that the folded lines all meet in the centre.
They can be fiddly and may adjustments, which is why tape might be the easier way to go.
Now that they've got their main shape, you will need a centrepiece - you could use a shape cutter, use a biscuit cutter as a stencil if you have any in fun shapes, or just cut shapes yourselves to glue to the centre. These shapes could be circles, stars or abstract shapes.
Once you've done this, your simple flower is done.
So, each flower should only take a couple of minutes to make, meaning that they can build up pretty quickly in order to make the perfect flower wall, perfect for Instagram, or a themed Spring/Summer party. You could even use standard white paper to create an amazingly beautiful and cheap feature.

Flower chain
This is a great way to decorate a child's bedroom and a perfect alternative to fairy lights! To make this simple flower chain, grab yourself some different coloured cards and some double-sided tape.
Then, cut the A4 paper width ways into narrow strips of about two centimetres. Use about eight strips to make each flower petal - by looping it back on itself and securing the two ends together (making sure not to make a fold).
Once you've done this to your eight petals, take the flat ends of the loop and secure them together in a circle. Then, cut and secure a small circle to the centre of the petals to finish off the flower.
To go on to make a chain, repeat the above instructions but when making one of the 8 loops, link it through one of the previous flowers. And before long, you'll have a beautiful and colourful decoration perfect as a gift!

Image © Sunflower Summer Co
Daffodils
To make some beautiful daffodils for a bunch of never-dying flowers, all you'll need it some wire (a clothes hanger perhaps), some blue-tack and some yellow and green card. Start by cutting six small daffodil shaped petals - try Google to get the idea, or get inspired by your garden if you're lucky enough to have any daffodils blooming.
Then, glue them together with the larger ends in the centre of the circle.
Next, using your yellow card again, cut a thin strip of about 1cm by 5cm and glue it into a circle shape by looping it around.
Once dry, cut tiny incisions along one side of the loop and fray the edges gently with your fingers to create the centrepiece of the flower. Glue this to the petals and your basic daffodil shape is there!
To make the stalks, take your wire and cut lengths of about 20-30cm.
You can either leave this bare or wrap it in green tissue paper or card to make it look more realistic - this will depend on how you intend to display them! Next, attach thin daffodil shaped leaves to the bottom of the stalks and blue-tack the head of the flower onto the stalk.
Once you've made about ten or so of these, you will have yourself a beautiful looking bunch of flowers that are bound to make someone's day - making it an easy craft idea for kids to follow for birthdays or special occasions.

Image © Burlap and Blue
Dahlias
This DIY craft idea works best with glue dots or double-sided tape, as there is a lot of folding and sticking that could otherwise get a bit messy! Start by gathering some different coloured cards - it's best to use similar colours for each creation, for instance, an orange and a yellow to start with.
Then, cut a strong base out of card for the petals to be attached to and you're ready to start making!
Cut lots of large diamond shapes out of your paper (maybe about 5cm tall) in one colour. As you're doing this, roll them up into an ice cream cone shape - so that one end is open and the petal has a pointed tip.
Secure them in this shape and keep making them until there is enough to complete an entire circle onto your base.
All of the petals should be touching in the centre. Once you've done this layer, you will start to see how the flower can be built up.
Continue to do these steps, but with each layer, use a smaller diamond shape and a different colour. Once your layering is done, you should be left with a dahlia that has a beautiful dome shape to it.
After you've finished a few in a range of colours, your display should be looking very impressive. And the great thing about this 3D paper flower idea is that it is completely flat on one side but very 3D on the other, meaning that it could be used on walls, cards or pictures and so on.


We Want Your Photos!
More for You
See All
Bachelor's degree specializing in Interior and Spatial Design
Annabelle BeaumontBachelor's degree specializing in Interior and Spatial Design
With a childhood spent traveling and exploring, Annabelle moved to Bahrain at 13 and then to London at 19 to attend Chelsea College of Arts, UAL to study Interior and Spatial Design. She has a passion for all things creative, particularly recycling materials. Outside of art, Annabelle enjoys walking her dogs and cooking for loved ones.
Disclaimer
1) Kidadl is independent and to make our service free to you the reader we are supported by advertising. We hope you love our recommendations for products and services! What we suggest is selected independently by the Kidadl team. If you purchase using the Buy Now button we may earn a small commission. This does not influence our choices. Prices are correct and items are available at the time the article was published but we cannot guarantee that on the time of reading. Please note that Kidadl is a participant in the Amazon Services LLC Associates Program, an affiliate advertising program designed to provide a means for sites to earn advertising fees by advertising and linking to Amazon. We also link to other websites, but are not responsible for their content.
2) At Kidadl, we strive to recommend the very best activities and events. We will always aim to give you accurate information at the date of publication - however, information does change, so it’s important you do your own research, double-check and make the decision that is right for your family. We recognise that not all activities and ideas are appropriate for all children and families or in all circumstances. Our recommended activities are based on age but these are a guide. We recommend that these ideas are used as inspiration, that ideas are undertaken with appropriate adult supervision, and that each adult uses their own discretion and knowledge of their children to consider the safety and suitability. Kidadl cannot accept liability for the execution of these ideas, and parental supervision is advised at all times, as safety is paramount. Anyone using the information provided by Kidadl does so at their own risk and we can not accept liability if things go wrong.
3) Because we are an educational resource, we have quotes and facts about a range of historical and modern figures. We do not endorse the actions of or rhetoric of all the people included in these collections, but we think they are important for growing minds to learn about under the guidance of parents or guardians.