15 Window Decoration Art Projects For Kids


Gallery
Window decoration art projects for kids are a wonderful way to encourage creativity and add a personal touch to your home. These projects allow children to express themselves artistically while creating beautiful decorations that can be displayed proudly in windows for all to admire.
With various materials and techniques to pick from, there's a window decoration project suitable for every season. These projects help develop skills like color recognition and pattern making. As kids craft their window art, they can experiment with different materials, colors, and designs, letting their imaginations run wild.
Window decoration art projects can also be a great way to celebrate different seasons, holidays, or special occasions. Kids can create colorful sun catchers for summer, spooky silhouettes for Halloween, or festive snowflakes for winter. Working on window art projects as a family can be a bonding experience, encouraging collaboration, and shared memories.
Tissue Paper-Stained Glass
 Shutterstock
Tissue paper-stained glass is a fun and creative project perfect for families. It involves layering colored tissue paper pieces onto a transparent adhesive surface like contact paper to mimic the beautiful effect of stained glass.
The materials needed are tissue paper, contact paper, and a frame made of cardstock or construction paper. The process involves cutting the tissue paper into small pieces or shapes, which can help younger children develop their fine motor skills.
Choosing colors and planning the design allows you to discuss color theory and how light passes through translucent materials, adding an educational element to the enjoyment.
Wax Paper Window Stars
Wax paper window stars are a captivating craft that brings warmth and color into any room. This project allows children to create art that interacts with natural light, transforming simple materials into something magical.
The process involves folding wax paper, also known as kite paper, into various shapes and patterns that, when combined, form a star. The materials required are minimal; wax or kite paper in various colors, scissors, and glue.
The choice of paper is also important, as kite paper is preferred over regular tissue paper due to its resistance to fading when exposed to sunlight.
This is an opportunity for artistic expression and it also serves as a hands-on geometry lesson, making it both fun and educational.
Construction Paper Scenes
Creating scenes with construction paper is a fantastic way for families to engage in a fun, creative activity. The best part about using construction paper is that you can pick any color you want to make your scene look just right.
This project involves cutting, layering, and assembling pieces of colored construction paper to form a balanced scene, such as a landscape, or cityscape, or a composition like a farm or a seasonal holiday scene.
First, you'll need to decide what kind of scene you want and make a plan. After that, cut and build your scene piece by piece. You can overlap the colored paper to make layers, and when you're done, you'll have awesome artwork to show off.
Top Tips:
To make construction paper scenes more dynamic, add interactive features like lift-up flaps revealing hidden details or movable elements attached to paper fasteners. This creates an engaging experience with elements of surprise.
For natural scenes with trees or flowers, using real-life references helps achieve realistic illustrations. Children can observe shapes, colors, and textures from nature to include in their artwork.
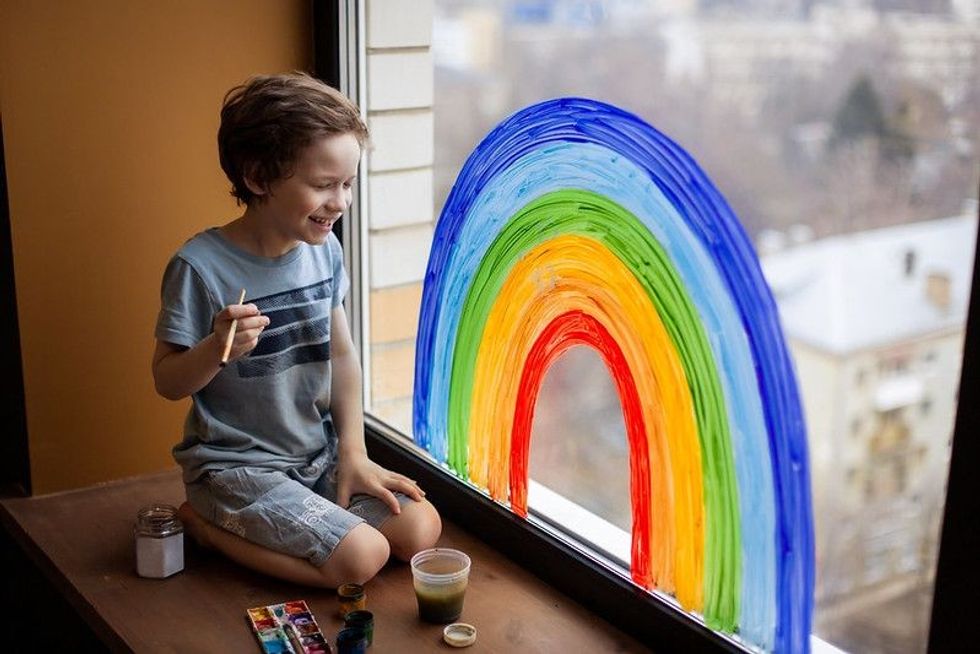
Window Clings With Acrylic Paint
 Shutterstock
This is a simple craft for kids. It involves using a mixture of glue and acrylic paint to make colorful, see-through designs that stick to windows and mirrors.
Children can start by mixing glue with a few drops of acrylic paint until they get the color they want. This mixture is then spread on a non-stick surface in a thin to medium layer and left to dry. Once dry, they can cut out fun shapes from the material using cookie cutters.
The final step is warming up the window clings by holding them in their hands or breathing on them to make them flexible before sticking them onto the window or mirror. When making these clings, it's important to spread the glue mixture evenly to avoid uneven drying.
Tissue Paper Suncatchers
Tissue paper suncatchers are a delightful craft project that families can enjoy together. This craft involves using small pieces of colored tissue paper to create designs that resemble stained glass when sunlight shines through them.
The process is straightforward and allows for a high degree of creativity, making it suitable for crafters of all ages.
The beauty of tissue paper suncatchers lies in their simplicity and customization. The secret is to arrange the tissue paper pieces in a way that enhances color overlap and reduces gaps, whether you are going for seasonal themes or particular shapes like hearts or animals.
Top Tips:
Materials include tissue paper, cut into pieces, and a transparent adhesive surface like contact paper or wax paper to hold the tissue paper in place.
Some variations of the project also include additional decorative elements such as glitter, sequins, or feathers to add texture and sparkle to the suncatchers.
Painted Freezer Paper Gallery
Freezer paper is a crafting material with one plastic- or wax-coated side that can be temporarily attached to fabric using an iron. The process involves cutting out a design from the freezer paper and ironing it shiny side down onto the cloth to form a seal that stops the paint from leaking.
The window could include examples of different paint applications, such as pouncing or brushing and highlighting the effects of various fabric paints, like matte, glossy, or metallic finishes.
Once the stencil is in place, fabric paint can be applied with a brush, and after the paint dries, the paper is peeled away to reveal the design.
Top Tips:
To add an educational twist, you can incorporate lessons about the color wheel, teaching kids how to create secondary colors from primary ones or how to use complementary colors for more vibrant designs.
Children can also use their painted freezer paper projects as personalized gifts for family and friends. Instead of just hanging the designs, your child can give the pretty flower picture to grandma or the puppy design to their cousin who loves dogs.
Permanent Marker Mandalas
Drawing mandalas with permanent markers begins with drawing circles and lines to form a grid-like structure on paper. This serves as the foundation for the mandala.
As the design unfolds, children can fill in the shapes with patterns and colors, using the markers to bring their mandalas to life. This process fosters creativity and a hands-on experience with concepts such as symmetry.
In addition to the artistic aspect, drawing mandalas with permanent markers can be a relaxing experience, as it requires focus and can help reduce stress. The repetitive patterns allow the mind to unwind while the colors bring a sense of joy and accomplishment.
Food Coloring And Glue Glass
This simple and creative craft allows families to make their own stained glass-like decorations. The process involves mixing clear glue with food coloring to achieve the desired color and then applying the mixture to a glass surface, such as a picture frame or vase.
This technique can also be used to create decorative items, from suncatchers to glassware. The project is not only a fun way to introduce children to color mixing and the basics of glass painting, but it also results in unique, eye-catching pieces that can brighten up any room.
The glue mixture dries translucent, allowing light to pass through and mimic the effect of traditional stained glass, adding a pop of color to windows or tabletops.
Pipe Cleaner And Bead Sparklers
This craft project involves threading colorful beads onto pipe cleaners, allowing children to mix and match colors to create sparkling designs.
The flexibility of pipe cleaners makes them ideal for bending into various shapes, and when decorated with beads, they catch the light beautifully, mimicking the sparkle of real fireworks.
You can also consider using glittery beads alongside the standard ones to enhance the sparkling effect. Once the beads are threaded, the ends of the pipe cleaners can be twisted to form a handle, making the sparklers easy for little hands to hold and wave around.
Displaying these handmade sparklers near a window can add a touch of sparkle to any room.
Crayon Resist Skyline
This engaging and imaginative activity allows children to create their own skyline using the crayon resist technique. This project starts with children drawing the outlines of buildings, bridges, and other elements of a skyline using crayons on paper.
The key is to apply a good amount of pressure while drawing to ensure the crayon lays down a thick layer of wax. This wax layer will act as resistance when watercolor paint is applied over it, allowing the crayon lines to show through vividly.
After the skyline is drawn, paint over the entire paper with watercolor. This is where the 'resist' part of the project comes into play, as the watercolor will fill in the negative space around the crayon lines, making the skyline pop.
Top Tips:
It's recommended to use blue or black watercolor to mimic the sky, but children can experiment with sunset or sunrise colors for a more dramatic effect.
Once dry, these artworks can be displayed on windows, where the light can shine through the translucent watercolor, enhancing the beauty of the children's creations
Coffee Filter Color Wheel
This project is an excellent way for kids to learn about color theory. To begin, children will use markers to apply different colors in segments on a coffee filter, creating a wheel with the primary colors, red, blue, and yellow, equally spaced.
They can then fill in the spaces between with secondary colors, orange, green, and violet, formed by mixing the primary colors.
After drawing the color wheel, a little water is given to the coffee filter, causing the colors to spread and blend at the edges, displaying a visual representation of color mixing. A spray bottle, brush, or dipping the coffee filter edge in a shallow dish of water can achieve this.
As the water travels across the filter, it carries the pigments with it. This activity not only teaches children about the relationships between colors but also allows them to see the blending process in action.
Top Tips:
The coffee filters serve as an ideal canvas for this project due to their absorbent nature, which helps in the diffusion and blending of colors.
Craft Foam Collages
Craft foam collages involve cutting shapes and pieces from colorful foam sheets to create themed scenes like gardens, outer space, or underwater worlds. Children can arrange and layer the foam pieces on a surface, which will make it look like the foam shapes are jumping off the surface.
To assemble their collages, kids can use glue or double-sided tape to secure the foam pieces in place. Mixing colors and textures, such as glittery or textured foam, adds visual interest to the artwork.
Once completed, the colorful foam collages can be proudly displayed on walls or windows, personalizing the family's living space with children's artwork.
Silhouette Shadows
This project combines the art of storytelling with visual expression, perfect for stimulating children's imaginations. In this activity, kids cut out shapes from black construction paper to create silhouettes of characters, objects, or scenes.
These silhouettes can be anything from animals to characters from their favorite stories or original creations from their imagination. Once the silhouettes are cut out, they can be temporarily fixed to a window using a light adhesive or tape.
As the natural light shines through the glass, the silhouettes cast shadows into the room, creating a visual effect. This setup becomes the backdrop for storytelling, where each silhouette can represent a character or element in the child's story.
Kids can rearrange the silhouettes on the window to change scenes or narratives to fit their stories.
Earth Day Eco-Art
This is an opportunity to engage children in activities that combine creativity with environmental education. This type of art project involves using recycled materials and natural elements to create artwork that celebrates the planet.
For example, children can create collages using scraps of paper from old magazines, emphasizing the importance of recycling and reusing materials.
When planning this project, it's essential to consider the lifecycle of the materials being used. Using non-toxic and easily recyclable items can minimize the environmental impact.
A good example is making seed paper, where children can create paper embedded with seeds that can be planted after use.
Painter's Tape Geometry
This is an interactive project that helps children explore mathematical concepts through art. This activity involves using painter's tape to create geometric shapes and patterns on surfaces like paper, or even directly on a window.
Kids can lay out the tape to form triangles, squares, and more complex shapes, creating a mosaic of intersecting lines and angles. Once the tape is in place, children can paint in the sections between the tape to create a colorful geometric design.
After the paint dries, removing the tape reveals clean lines that define the shapes, creating a visual contrast against the painted areas.
FAQs
How can I ensure the window art projects are easy to remove?
Make use of materials that are non-permanent like washable markers, water-based paints, and static clings. Using white glue or painter’s tape can also help in easy removal without residue.
What safety considerations should I keep in mind for kids doing window art?
Always supervise younger children, ensure any permanent materials like markers are used with care, and avoid glass or sharp objects. Also, be mindful of allergies to specific substances used in crafting.
Can window art projects be educational?
Absolutely! Window art can teach about colors, shapes, seasons, and holidays. It's also a perfect opportunity for children to practice motor skills and learn about artistic principles such as transparency and color blending.
Window decoration art projects are so much more than just crafts for kids. They provide a fun way to learn new skills while allowing children's creativity to shine. Best of all, these colorful, imaginative window decorations become a source of pride when displayed for the whole family and neighborhood to enjoy.


We Want Your Photos!
More for You


Sources
https://makeandtakes.com/rainbow-marker-coffee-filters
https://www.aubreeoriginals.com/tissue-paper-stained-glass/
https://rhythmsofplay.com/rainbow-window-star/
http://teachersmag.com/posts/scrap-construction-paper-craft-ideas
https://modpodgerocksblog.com/diy-window-clings-using-mod-podge/
https://artfulparent.com/how-to-make-tissue-paper-suncatchers/
https://www.artisbasic.com/2014/11/mandalas-3rd-4th-grade.html
https://lazerian.com/blog/environmental-art-and-its-importance-on-earth-day/
See All
Bachelor of Science specializing in Mass Communication.
Adekunle Olanrewaju JasonBachelor of Science specializing in Mass Communication.
Bachelor of Science specializing in Human Anatomy

Joan AgieBachelor of Science specializing in Human Anatomy
With 3+ years of research and content writing experience across several niches, especially on education, technology, and business topics. Joan holds a Bachelor’s degree in Human Anatomy from the Federal University of Technology, Akure, Nigeria, and has worked as a researcher and writer for organizations across Nigeria, the US, the UK, and Germany. Joan enjoys meditation, watching movies, and learning new languages in her free time.
Disclaimer
1) Kidadl is independent and to make our service free to you the reader we are supported by advertising. We hope you love our recommendations for products and services! What we suggest is selected independently by the Kidadl team. If you purchase using the Buy Now button we may earn a small commission. This does not influence our choices. Prices are correct and items are available at the time the article was published but we cannot guarantee that on the time of reading. Please note that Kidadl is a participant in the Amazon Services LLC Associates Program, an affiliate advertising program designed to provide a means for sites to earn advertising fees by advertising and linking to Amazon. We also link to other websites, but are not responsible for their content.
2) At Kidadl, we strive to recommend the very best activities and events. We will always aim to give you accurate information at the date of publication - however, information does change, so it’s important you do your own research, double-check and make the decision that is right for your family. We recognise that not all activities and ideas are appropriate for all children and families or in all circumstances. Our recommended activities are based on age but these are a guide. We recommend that these ideas are used as inspiration, that ideas are undertaken with appropriate adult supervision, and that each adult uses their own discretion and knowledge of their children to consider the safety and suitability. Kidadl cannot accept liability for the execution of these ideas, and parental supervision is advised at all times, as safety is paramount. Anyone using the information provided by Kidadl does so at their own risk and we can not accept liability if things go wrong.
3) Because we are an educational resource, we have quotes and facts about a range of historical and modern figures. We do not endorse the actions of or rhetoric of all the people included in these collections, but we think they are important for growing minds to learn about under the guidance of parents or guardians.